Python GUI之如何使用tkinter控件
格式:Button(父對(duì)象,options,…)
父對(duì)象:表示當(dāng)前按鈕建立在哪一個(gè)窗口下。
options:下面總結(jié)一部常用的。
1.bg或者background:背景色
2.fg或者foreground:前景色
3.command:?jiǎn)螕舭粹o時(shí),執(zhí)行此方案
4.font:字體
5.height:字符高度
6.width:字符寬度
7.image:按鈕上的圖片
8.padx:設(shè)置文字與按鈕左右間隔
9.pady:設(shè)置文字與按鈕上下間隔
10.state:NORMAL表示啟用按鈕,DISABLED表示禁用按鈕
11.text:字符
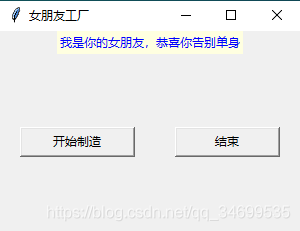
Button 初體驗(yàn):這里我們建造一個(gè)制造女朋友的工廠,你只需要點(diǎn)一下按鈕就可以告別單身狗
from tkinter import *def msgShow(): label['text']='我是你的女朋友,恭喜你告別單身' label['bg']='lightyellow' label['fg']='blue'# 實(shí)例對(duì)象root=Tk()root.title('女朋友工廠')root.geometry('300x200+500+500')label=Label(root)btn=Button(root,text='開始制造',command=msgShow,width=15)btnCls=Button(root,text='結(jié)束',command=root.destroy,width=15)# 控件顯示label.pack(side=TOP)btn.pack(side=LEFT,padx=20)btnCls.pack(side=RIGHT,padx=20)# 窗體暫停root.mainloop()
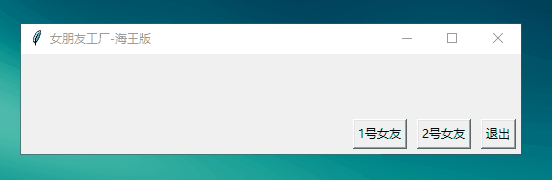
Button 進(jìn)階體驗(yàn):上面的工廠只能造一個(gè)女朋友,但是作為一個(gè)海王,你現(xiàn)在想多擁有幾個(gè)女朋友,那么現(xiàn)在你需要一個(gè)能制造多個(gè)女朋友的工廠【使用Lambda表達(dá)式】
from tkinter import *# 工廠def mkGrilFriend(name): lbl.config(text=str('我是'+name+'小姐姐,從現(xiàn)在開始我就是你的女朋友啦!!!'))root=Tk()root.title('改變窗體顏色')root.geometry('500x100')lbl=Label(root)lbl.pack()exitBtn=Button(root,text='退出',command=root.destroy)# 制造女友oneBtn=Button(root,text='1號(hào)女友',command=lambda:mkGrilFriend('田園my 老師'))twoBtn=Button(root,text='2號(hào)女友',command=lambda:mkGrilFriend('三上yy 老師'))exitBtn.pack(anchor=S,side=RIGHT,padx=5,pady=5)twoBtn.pack(anchor=S,side=RIGHT,padx=5,pady=5)oneBtn.pack(anchor=S,side=RIGHT,padx=5,pady=5)root.mainloop()
運(yùn)行結(jié)果:
格式:Entry(父對(duì)象,options,…)
options參數(shù)主要包括以下:
1.bg:背景色
2.fg:字體顏色
3.command:當(dāng)用戶更改內(nèi)容時(shí),觸發(fā)此函數(shù)
4.font:字體
5.height:字符高度
6.width:字符寬度
7.selectbackground:被選定字符的背景色
8.show:常用于隱藏顯示密碼字段,ps:show= ’ * ’
9.state: NORMAL正常輸入,DISABLE表示禁止輸入
10.xscrollcommand:在x軸顯示滾動(dòng)條
包括方法:
1.get() 獲取文本框內(nèi)的字符串內(nèi)容:ety.get()
2.insert() 插入字符串到文本框:ety.insert(開始位置索引,要插入的字符串)
3.delete() 刪除文本框中的字符串:ety.delete(開始位置索引,截止位置索引:END等于全刪)
4.eval() 數(shù)學(xué)表達(dá)公式:results=eval(2+3*5)
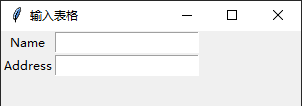
三、練習(xí)一from tkinter import *root=Tk()root.title('輸入表格')root.geometry('300x200')nameLbl=Label(root,text='Name')nameLbl.grid(row=0,column=0)addressLbl=Label(root,text='Address')addressLbl.grid(row=1,column=0)nameEty=Entry(root)addressEty=Entry(root)nameEty.grid(row=0,column=1)addressEty.grid(row=1,column=1)root.mainloop()
運(yùn)行:
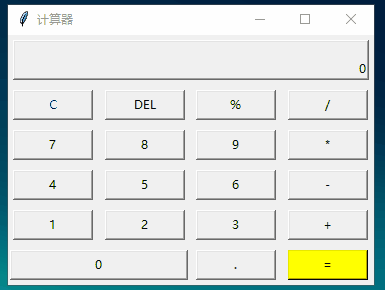
from tkinter import *# 計(jì)算函數(shù)def calculate(): result=eval(equ.get()) # 獲取輸入公式 equ.set(equ.get()+'=n'+str(result)) # 輸入公式 + 回車換行 + 結(jié)果# 顯示到 Labeldef show(buttonString): content=equ.get() # 獲取公式變量,并拼接到content后面 if content=='0':content='' equ.set(content+buttonString) # 顯示到labeldef backspace(): equ.set(str(equ.get()[:-1])) # equ 變量-1def clear(): equ.set('0')root=Tk()root.title('計(jì)算器')# 公共變量,記錄公式equ=StringVar()equ.set('0')# textvariable:指定一個(gè)變量刷新text值,這里的equ的set屬性改變,label的text也會(huì)變化label=Label(root,width=50,height=2,relief='raised',anchor=SE,textvariable=equ)# columnspan:橫跨4個(gè)按鈕label.grid(row=0,column=0,columnspan=4,padx=5,pady=5)# 第二行 [0,1,2,3列]clearBtn=Button(root,text='C',fg='blue',width=10,command=clear).grid(row=1,column=0,pady=5)Button(root,text='DEL',width=10,command=backspace).grid(row=1,column=1)Button(root,text='%',width=10,command=lambda:show('%')).grid(row=1,column=2)Button(root,text='/',width=10,command=lambda:show('/')).grid(row=1,column=3)# 第三行 [0,1,2,3列]Button(root,text='7',width=10,command=lambda:show('7')).grid(row=2,column=0,pady=5)Button(root,text='8',width=10,command=lambda:show('8')).grid(row=2,column=1)Button(root,text='9',width=10,command=lambda:show('9')).grid(row=2,column=2)Button(root,text='*',width=10,command=lambda:show('*')).grid(row=2,column=3)# 第四行 [0,1,2,3列]Button(root,text='4',width=10,command=lambda:show('4')).grid(row=3,column=0,pady=5)Button(root,text='5',width=10,command=lambda:show('5')).grid(row=3,column=1)Button(root,text='6',width=10,command=lambda:show('6')).grid(row=3,column=2)Button(root,text='-',width=10,command=lambda:show('-')).grid(row=3,column=3)# 第五行 [0,1,2,3列]Button(root,text='1',width=10,command=lambda:show('1')).grid(row=4,column=0,pady=5)Button(root,text='2',width=10,command=lambda:show('2')).grid(row=4,column=1)Button(root,text='3',width=10,command=lambda:show('3')).grid(row=4,column=2)Button(root,text='+',width=10,command=lambda:show('+')).grid(row=4,column=3)# 第六行 [0,1,2,3列]Button(root,text='0',width=24,command=lambda:show('0')).grid(row=5,column=0,columnspan=2,pady=5)Button(root,text='.',width=10,command=lambda:show('.')).grid(row=5,column=2)Button(root,text='=',width=10,bg='yellow',command=lambda:calculate()).grid(row=5,column=3)mainloop()
運(yùn)行:
到此這篇關(guān)于Python GUI之如何使用tkinter控件的文章就介紹到這了,更多相關(guān)tkinter控件的使用內(nèi)容請(qǐng)搜索好吧啦網(wǎng)以前的文章或繼續(xù)瀏覽下面的相關(guān)文章希望大家以后多多支持好吧啦網(wǎng)!
相關(guān)文章:
1. python excel和yaml文件的讀取封裝2. moment轉(zhuǎn)化時(shí)間戳出現(xiàn)Invalid Date的問(wèn)題及解決3. python爬蟲實(shí)戰(zhàn)之制作屬于自己的一個(gè)IP代理模塊4. php實(shí)現(xiàn)當(dāng)前用戶在線人數(shù)5. Android中的緩存6. Android Studio插件7. Android組件化和插件化開發(fā)8. Python中內(nèi)建模塊collections如何使用9. Java CountDownLatch應(yīng)用場(chǎng)景代碼實(shí)例10. .net6 在中標(biāo)麒麟下的安裝和部署過(guò)程

 網(wǎng)公網(wǎng)安備