OpenCV+python實(shí)現(xiàn)實(shí)時(shí)目標(biāo)檢測(cè)功能
環(huán)境安裝
安裝Anaconda,官網(wǎng)鏈接Anaconda 使用conda創(chuàng)建py3.6的虛擬環(huán)境,并激活使用conda create -n py3.6 python=3.6 //創(chuàng)建conda activate py3.6 //激活

3.安裝依賴(lài)numpy和imutils
//用鏡像安裝pip install -i https://pypi.tuna.tsinghua.edu.cn/simple numpypip install -i https://pypi.tuna.tsinghua.edu.cn/simple imutils
4.安裝opencv
(1)首先下載opencv(網(wǎng)址:opencv),在這里我選擇的是opencv_python‑4.1.2+contrib‑cp36‑cp36m‑win_amd64.whl 。(2)下載好后,把它放到任意盤(pán)中(這里我放的是D盤(pán)),切換到安裝目錄,執(zhí)行安裝命令:pip install opencv_python‑4.1.2+contrib‑cp36‑cp36m‑win_amd64.whl
代碼
首先打開(kāi)一個(gè)空文件命名為real_time_object_detection.py,加入以下代碼,導(dǎo)入你所需要的包。
# import the necessary packagesfrom imutils.video import VideoStreamfrom imutils.video import FPSimport numpy as npimport argparseimport imutilsimport timeimport cv2
2.我們不需要圖像參數(shù),因?yàn)樵谶@里我們處理的是視頻流和視頻——除了以下參數(shù)保持不變:?prototxt:Caffe prototxt 文件路徑。?model:預(yù)訓(xùn)練模型的路徑。?confidence:過(guò)濾弱檢測(cè)的最小概率閾值,默認(rèn)值為 20%。
# construct the argument parse and parse the argumentsap = argparse.ArgumentParser()ap.add_argument('-p', '--prototxt', required=True,help='path to Caffe ’deploy’ prototxt file')ap.add_argument('-m', '--model', required=True,help='path to Caffe pre-trained model')ap.add_argument('-c', '--confidence', type=float, default=0.2,help='minimum probability to filter weak detections')args = vars(ap.parse_args())
3.初始化類(lèi)列表和顏色集,我們初始化 CLASS 標(biāo)簽,和相應(yīng)的隨機(jī) COLORS。
# initialize the list of class labels MobileNet SSD was trained to# detect, then generate a set of bounding box colors for each classCLASSES = ['background', 'aeroplane', 'bicycle', 'bird', 'boat','bottle', 'bus', 'car', 'cat', 'chair', 'cow', 'diningtable','dog', 'horse', 'motorbike', 'person', 'pottedplant', 'sheep','sofa', 'train', 'tvmonitor']COLORS = np.random.uniform(0, 255, size=(len(CLASSES), 3))
4.加載自己的模型,并設(shè)置自己的視頻流。
# load our serialized model from diskprint('[INFO] loading model...')net = cv2.dnn.readNetFromCaffe(args['prototxt'], args['model'])# initialize the video stream, allow the cammera sensor to warmup,# and initialize the FPS counterprint('[INFO] starting video stream...')vs = VideoStream(src=0).start()time.sleep(2.0)fps = FPS().start()
首先我們加載自己的序列化模型,并且提供對(duì)自己的 prototxt文件 和模型文件的引用net = cv2.dnn.readNetFromCaffe(args['prototxt'], args['model'])。下一步,我們初始化視頻流(來(lái)源可以是視頻文件或攝像頭)。首先,我們啟動(dòng) VideoStreamvs = VideoStream(src=0).start(),隨后等待相機(jī)啟動(dòng)time.sleep(2.0),最后開(kāi)始每秒幀數(shù)計(jì)算fps = FPS().start()。VideoStream 和 FPS 類(lèi)是 imutils 包的一部分。
5.遍歷每一幀
# loop over the frames from the video streamwhile True:# grab the frame from the threaded video stream and resize it# to have a maximum width of 400 pixelsframe = vs.read()frame = imutils.resize(frame, width=400)# grab the frame from the threaded video file stream(h, w) = frame.shape[:2]blob = cv2.dnn.blobFromImage(cv2.resize(frame, (300, 300)),0.007843, (300, 300), 127.5)# pass the blob through the network and obtain the detections and# predictionsnet.setInput(blob)detections = net.forward()
首先,從視頻流中讀取一幀frame = vs.read(),隨后調(diào)整它的大小imutils.resize(frame, width=400)。由于我們隨后會(huì)需要寬度和高度,接著進(jìn)行抓取(h, w) = frame.shape[:2]。最后將 frame 轉(zhuǎn)換為一個(gè)有 dnn 模塊的 blob,cv2.dnn.blobFromImage(cv2.resize(frame, (300, 300)),0.007843, (300, 300), 127.5)。現(xiàn)在,我們?cè)O(shè)置 blob 為神經(jīng)網(wǎng)絡(luò)的輸入net.setInput(blob),通過(guò) net 傳遞輸入detections = net.forward()。
6.這時(shí),我們已經(jīng)在輸入幀中檢測(cè)到了目標(biāo),現(xiàn)在看看置信度的值,來(lái)判斷我們能否在目標(biāo)周?chē)L制邊界框和標(biāo)簽。
# loop over the detectionsfor i in np.arange(0, detections.shape[2]):# extract the confidence (i.e., probability) associated with# the predictionconfidence = detections[0, 0, i, 2]# filter out weak detections by ensuring the `confidence` is# greater than the minimum confidenceif confidence > args['confidence']:# extract the index of the class label from the# `detections`, then compute the (x, y)-coordinates of# the bounding box for the objectidx = int(detections[0, 0, i, 1])box = detections[0, 0, i, 3:7] * np.array([w, h, w, h])(startX, startY, endX, endY) = box.astype('int')# draw the prediction on the framelabel = '{}: {:.2f}%'.format(CLASSES[idx],confidence * 100)cv2.rectangle(frame, (startX, startY), (endX, endY),COLORS[idx], 2)y = startY - 15 if startY - 15 > 15 else startY + 15cv2.putText(frame, label, (startX, y),cv2.FONT_HERSHEY_SIMPLEX, 0.5, COLORS[idx], 2)
在 detections 內(nèi)循環(huán),一個(gè)圖像中可以檢測(cè)到多個(gè)目標(biāo)。因此我們需要檢查置信度。如果置信度足夠高(高于閾值),那么將在終端展示預(yù)測(cè),并以文本和彩色邊界框的形式對(duì)圖像作出預(yù)測(cè)。在 detections 內(nèi)循環(huán),首先我們提取 confidence 值,confidence = detections[0, 0, i, 2]。如果 confidence 高于最低閾值(if confidence > args['confidence']:),那么提取類(lèi)標(biāo)簽索引(idx = int(detections[0, 0, i, 1])),并計(jì)算檢測(cè)到的目標(biāo)的坐標(biāo)(box = detections[0, 0, i, 3:7] * np.array([w, h, w, h]))。然后,我們提取邊界框的 (x, y) 坐標(biāo)((startX, startY, endX, endY) = box.astype('int')),將用于繪制矩形和文本。接著構(gòu)建一個(gè)文本 label,包含 CLASS 名稱(chēng)和 confidence(label = '{}: {:.2f}%'.format(CLASSES[idx],confidence * 100))。還要使用類(lèi)顏色和之前提取的 (x, y) 坐標(biāo)在物體周?chē)L制彩色矩形(cv2.rectangle(frame, (startX, startY), (endX, endY),COLORS[idx], 2))。如果我們希望標(biāo)簽出現(xiàn)在矩形上方,但是如果沒(méi)有空間,我們將在矩形頂部稍下的位置展示標(biāo)簽(y = startY - 15 if startY - 15 > 15 else startY + 15)。最后,我們使用剛才計(jì)算出的 y 值將彩色文本置于幀上(cv2.putText(frame, label, (startX, y),cv2.FONT_HERSHEY_SIMPLEX, 0.5, COLORS[idx], 2))。
7.幀捕捉循環(huán)剩余的步驟還包括:展示幀;檢查 quit 鍵;更新 fps 計(jì)數(shù)器。
# show the output framecv2.imshow('Frame', frame)key = cv2.waitKey(1) & 0xFF# if the `q` key was pressed, break from the loopif key == ord('q'):break# update the FPS counterfps.update()
上述代碼塊簡(jiǎn)單明了,首先我們展示幀(cv2.imshow('Frame', frame)),然后找到特定按鍵(key = cv2.waitKey(1) & 0xFF),同時(shí)檢查「q」鍵(代表「quit」)是否按下。如果已經(jīng)按下,則我們退出幀捕捉循環(huán)(if key == ord('q'):break),最后更新 fps 計(jì)數(shù)器(fps.update())。
8.退出了循環(huán)(「q」鍵或視頻流結(jié)束),我們還要處理以下。
# stop the timer and display FPS informationfps.stop()print('[INFO] elapsed time: {:.2f}'.format(fps.elapsed()))print('[INFO] approx. FPS: {:.2f}'.format(fps.fps()))# do a bit of cleanupcv2.destroyAllWindows()vs.stop()
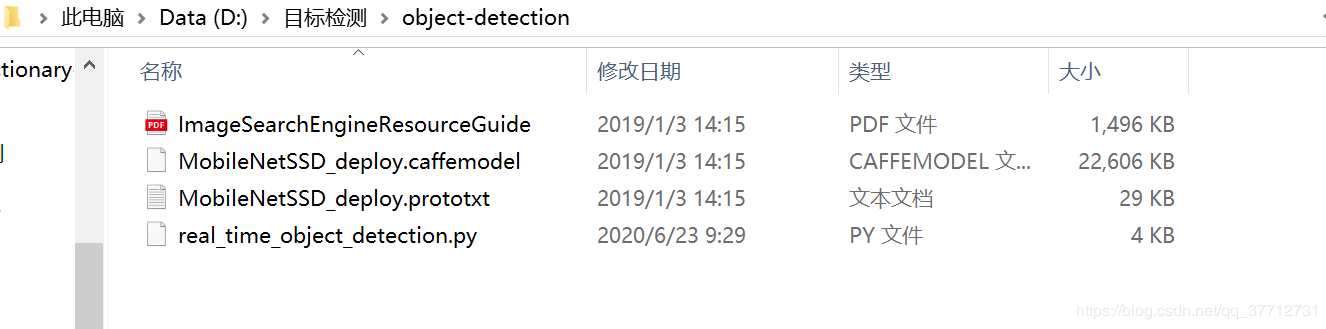
運(yùn)行文件目錄有以下文件:
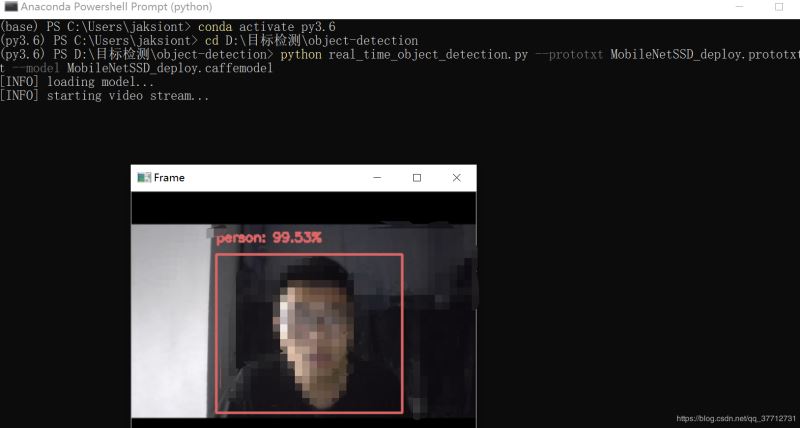
到文件相應(yīng)的目錄下:cd D:目標(biāo)檢測(cè)object-detection執(zhí)行命令:python real_time_object_detection.py --prototxt MobileNetSSD_deploy.prototxt.txt --model MobileNetSSD_deploy.caffemodel
演示
這里我把演示視頻上傳到了B站,地址鏈接目標(biāo)檢測(cè)
補(bǔ)充
項(xiàng)目github地址object_detection鏈接。本項(xiàng)目要用到MobileNetSSD_deploy.prototxt.txt和MobileNetSSD_deploy.caffemodel,可以去github上下載項(xiàng)目運(yùn)行。
到此這篇關(guān)于OpenCV+python實(shí)現(xiàn)實(shí)時(shí)目標(biāo)檢測(cè)功能的文章就介紹到這了,更多相關(guān)python實(shí)現(xiàn)目標(biāo)檢測(cè)內(nèi)容請(qǐng)搜索好吧啦網(wǎng)以前的文章或繼續(xù)瀏覽下面的相關(guān)文章希望大家以后多多支持好吧啦網(wǎng)!
相關(guān)文章:
1. Java8內(nèi)存模型PermGen Metaspace實(shí)例解析2. 利用單元測(cè)試對(duì)PHP代碼進(jìn)行檢查3. python如何實(shí)現(xiàn)word批量轉(zhuǎn)HTML4. python excel和yaml文件的讀取封裝5. python3實(shí)現(xiàn)往mysql中插入datetime類(lèi)型的數(shù)據(jù)6. moment轉(zhuǎn)化時(shí)間戳出現(xiàn)Invalid Date的問(wèn)題及解決7. python爬蟲(chóng)實(shí)戰(zhàn)之制作屬于自己的一個(gè)IP代理模塊8. python操作數(shù)據(jù)庫(kù)獲取結(jié)果之fetchone和fetchall的區(qū)別說(shuō)明9. Django 權(quán)限管理(permissions)與用戶(hù)組(group)詳解10. App啟動(dòng)優(yōu)化-Android性能優(yōu)化

 網(wǎng)公網(wǎng)安備